The very reason I went to Bhutan was to see the Tiger’s Nest, a monastery located in Paro, hence the other name Paro Taktsang. It was constructed in 1692, around the cave where Guru Rinpoche first meditated, the event that introduced Buddhism into Bhutan. There’s a legend that Guru Rinpoche was carried from Tibet to this location on the back of a tigress, thus the name Tiger’s Nest.
Is climbing up Tiger’s Nest without hiking experience possible?
I’ve hiked a couple of times prior to this trip. And they were years apart, which means I didn’t physically prepare myself before the hike to Paro Taktsang. So yes, you may climb up the Tiger’s Nest even if you’re a beginner.
How about the people who just don’t have enough stamina to walk up the mountain?
Due to its location the only way to get there is by hiking, which is separated into two by level of difficulty. The initial trail is quite challenging as some parts are steep and slippery. Renting a horse is available at the ground (starting point) to carry you up until halfway of the trek, which is marked by the cafeteria. From here, the trail is smooth and concrete.
Since hike to the Tiger’s Nest usually comes last on your itinerary in Bhutan to get acclimated to the higher altitude, worry not of altitude sickness.
Now that you know you can do it, are you ready to see Bhutan’s most popular icon? Let’s get started. Enjoy!
How to get there?
First, you need to know where to go to in order to get to Bhutan. Please read My Bhutan Diary.
Since most likely you’ll be in an organized tour, transportation will be arranged for you.
What to bring
- Light bag with your ‘essentials’
- Snacks like chocolates
- Water (our tour company provided)
- Sun shields like cap, sun glasses, umbrella (depends on the season, check the weather forecast)
- Hiking pole
There are wooden poles for rent at the ground if you don’t have hiking pole. I recommend securing one for your knees.

Make sure to eat heavy breakfast and use the toilet if possible before leaving the hotel.
Now let’s go!


From here, the trail is smooth but with lots of stairs. We skipped lunch so as to avoid the crowd. Instead, we ate in the cafeteria on our way back.
Our hike continued and I enjoyed the views over the valley as we get higher. The scenery just kept getting better.

As we approach the three famous spots for that gram photos, we didn’t let the opportunity pass. We made sure to get all the photographs we’d want.


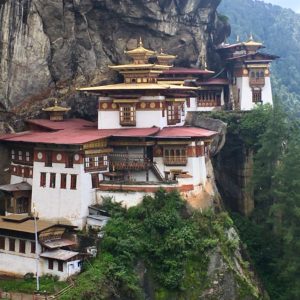
There it is, precariously perched on the side of a mountain hundreds of meters off of the ground.
Beautiful waterfalls welcomed us just before we reached the doorstep to the monastery.


Finally, we reached the Tiger’s Nest! Photography is allowed up to this point only. Bags and cameras are deposited in the secured lockers provided.

The entire journey would take about 4-5 hours, exclusive of the time spent in the monastery. But then again, it’s not a race. Take your time and enjoy. Seeing the Tiger’s Nest is not just for experienced hikers. Go tick it off from your bucket list.
This experience is one for the book. I will forever remember it.
With ❤️,
Sugar
